Dataset
Upload Data
After the project is successfully created, you can upload image data by Select Files or Select Folder or Import from other project. The uploaded image data will be added to the project for subsequent annotation work.
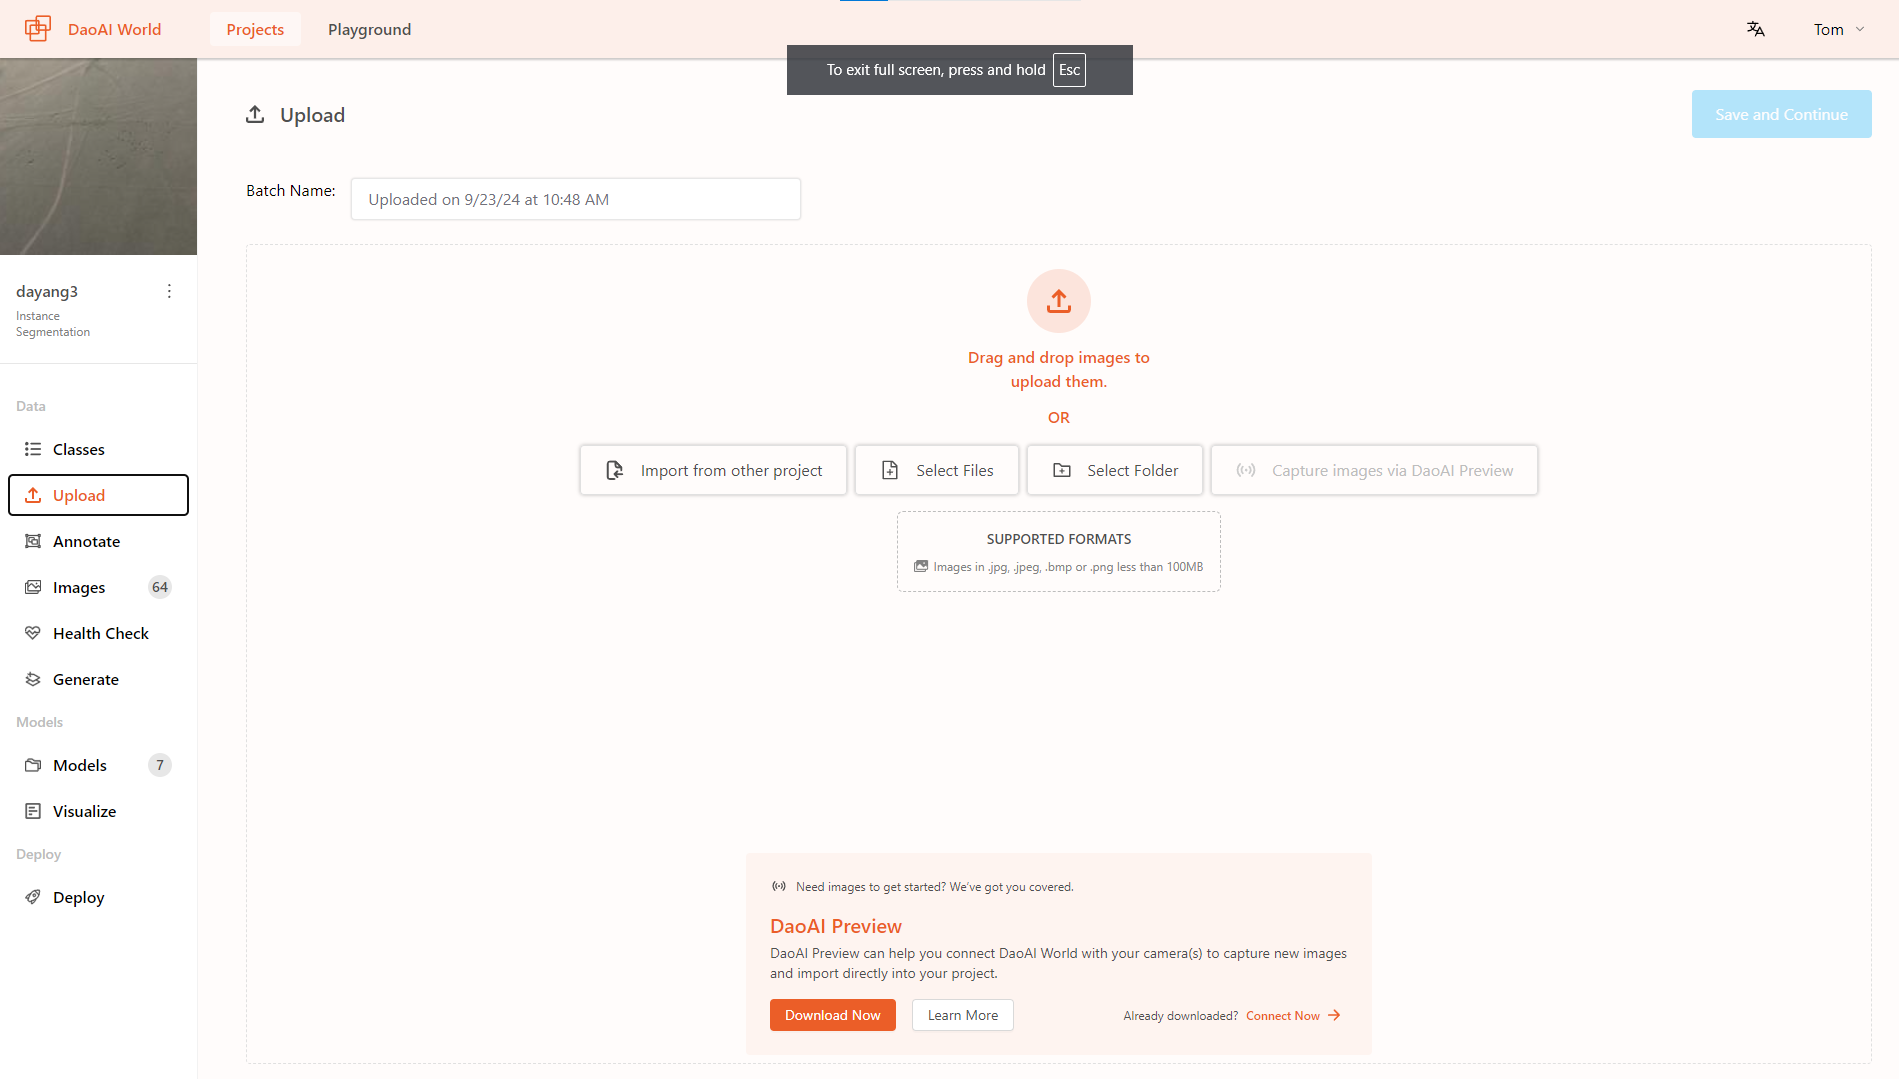
The dataset supports image files in
.jpeg,.jpg,.png, and.bmpformats, as well as annotation files in .json format. If the uploaded data includes annotation files in .json format, the system will automatically read the annotation information from the files and display it in the annotation section. You can review the recognized annotations to ensure that there are no errors in the image annotations.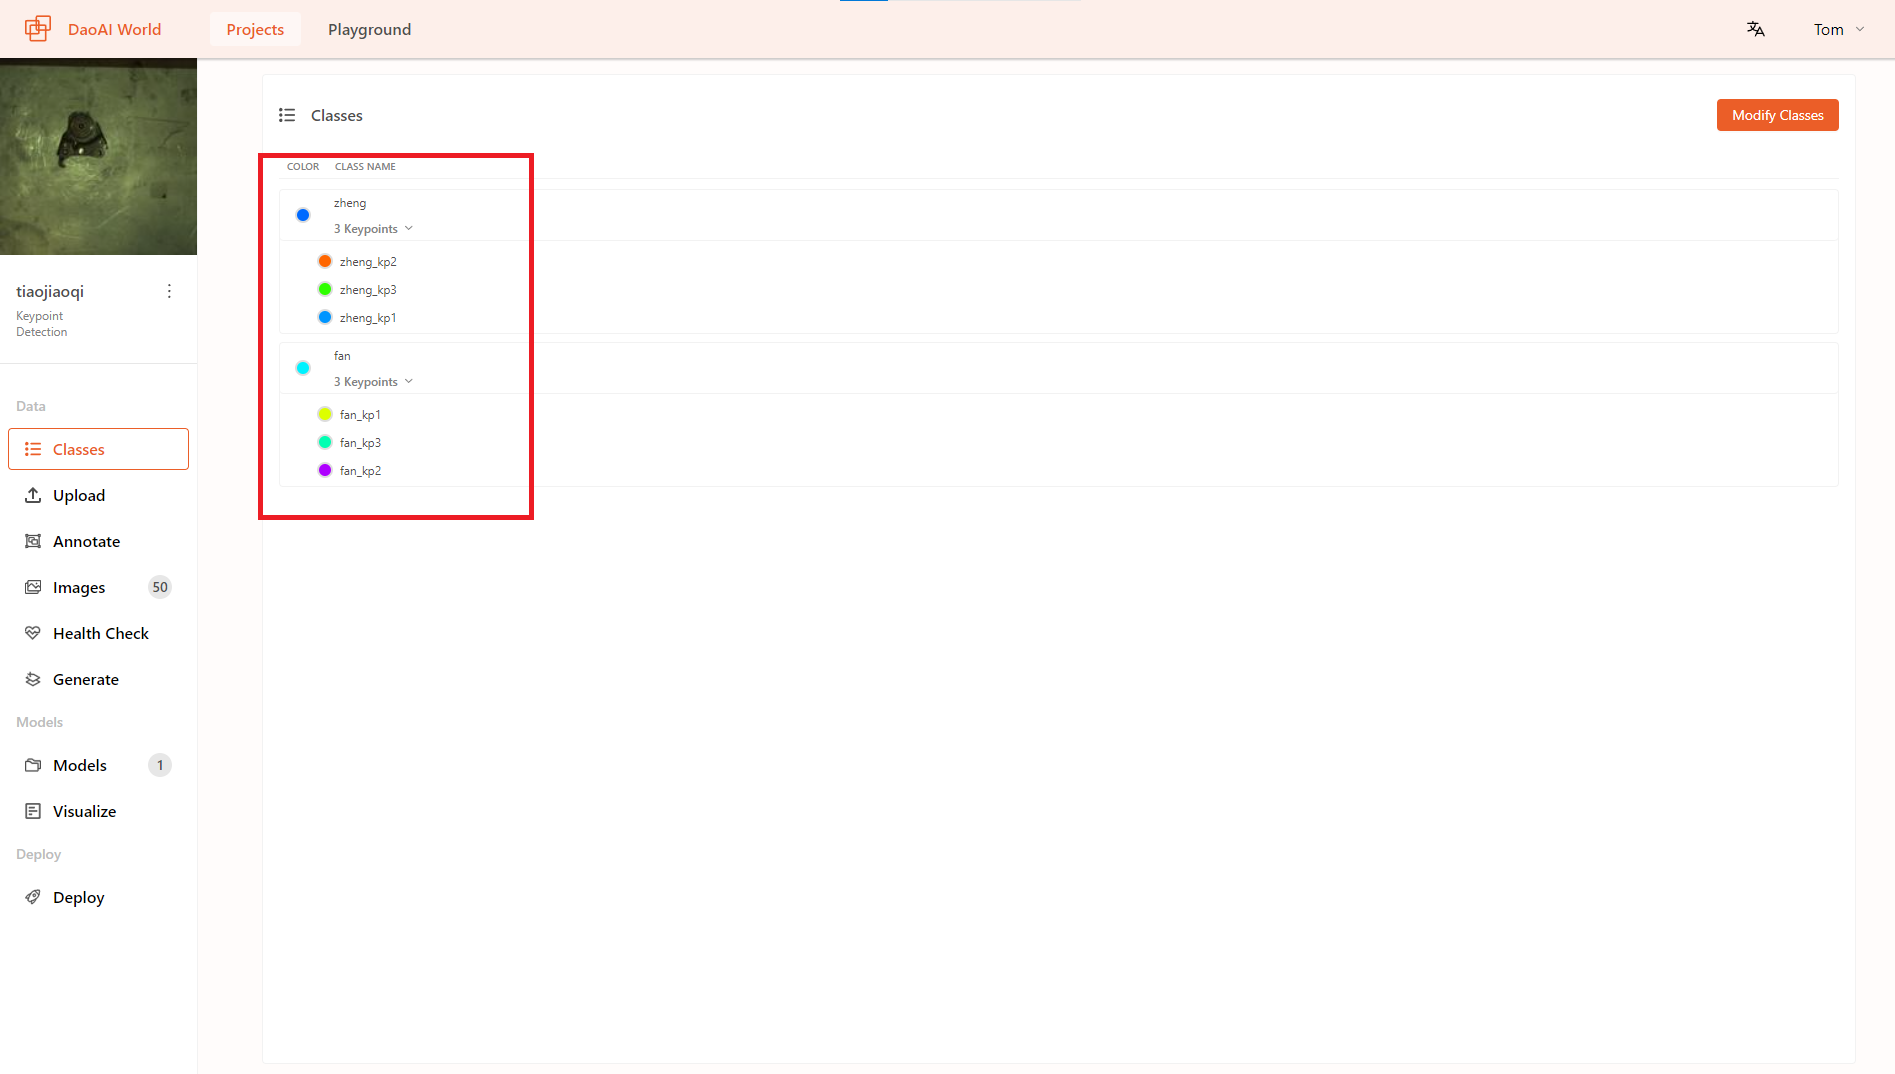
小技巧
Import from other project supports importing polygon annotations, which are automatically converted into bounding boxes.
警告
Please note that due to system limitations, image file sizes cannot exceed 50MB. It is also recommended to upload fewer than 1000 images at a time, as uploading too many images in a single batch may result in upload failure.
Label Management
You can manage the labels within your project on the Classes page.
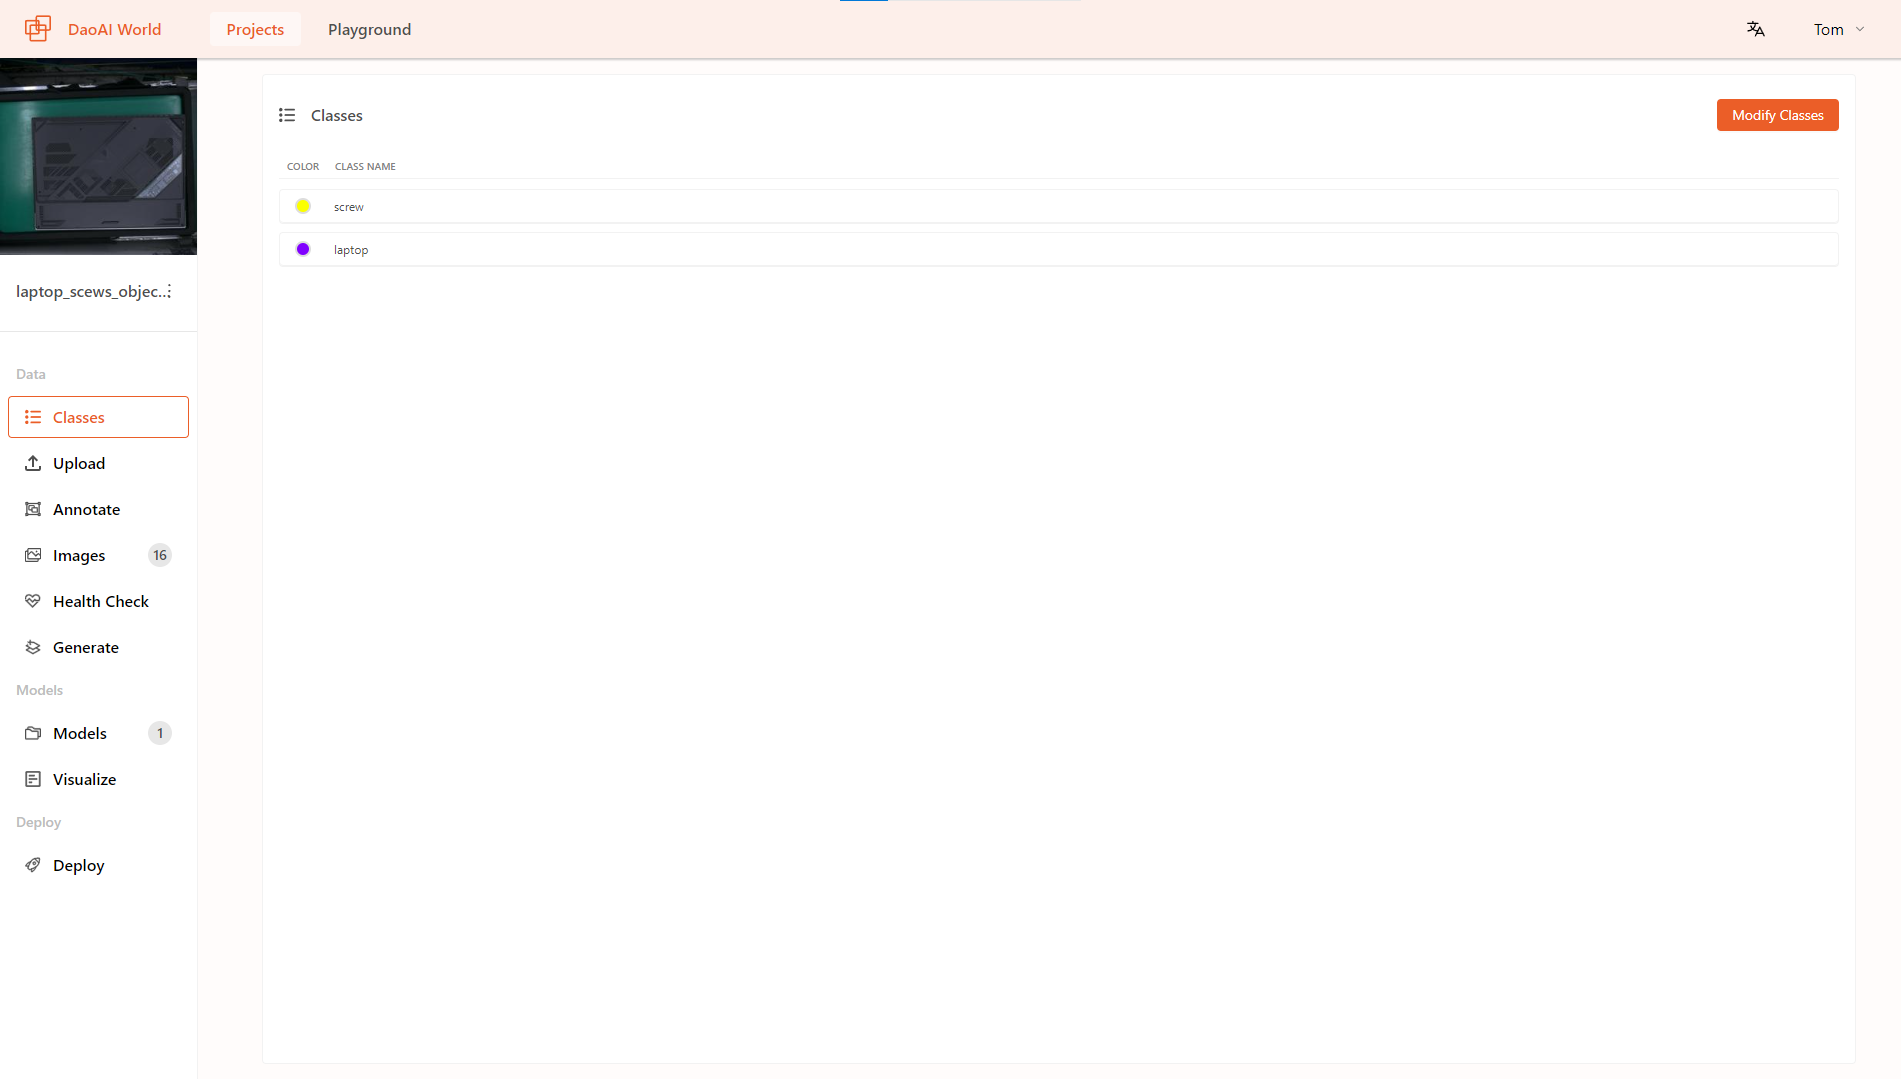
Click on the
Modify Classesbutton in the upper right corner to open the label editing window, where you can add or remove labels.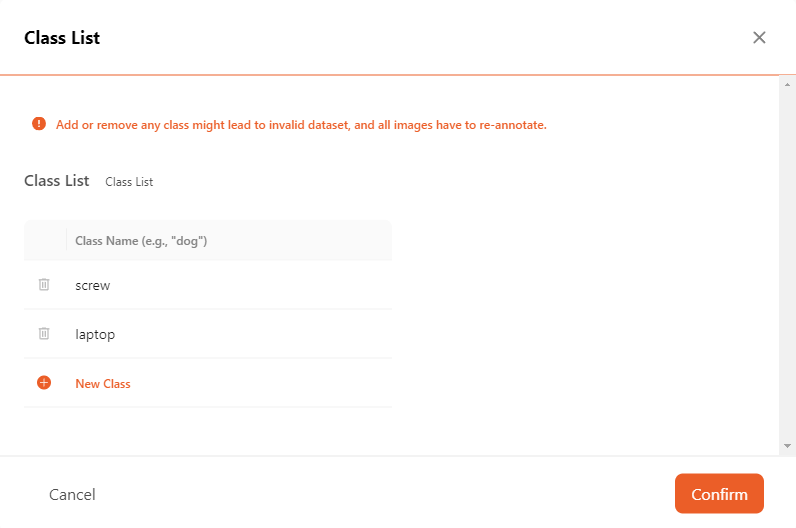
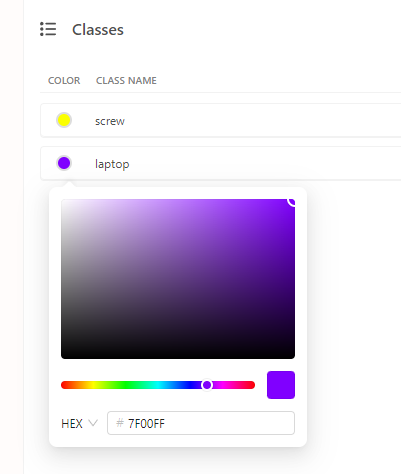
You can click on the color next to the label to change the label's display color and the outline color within the project.
Capture images via DaoAI Preview
If your work environment already has a set up 2D camera, you can also use the DaoAI Preview tool to collect data on-site using the 2D camera for upload, or to take real-time photos to test the already trained model.
On the upload page, you can click "Download Now" under DaoAI Preview to download the DaoAI Preview tool.

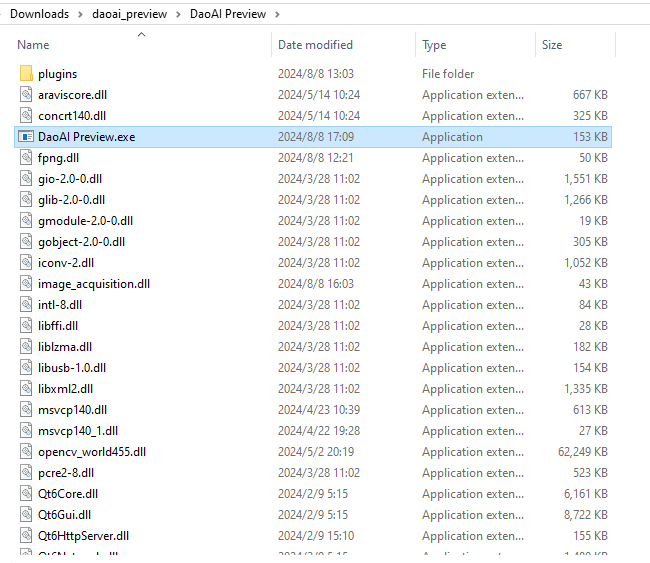
After downloading, unzip the file and then open DaoAI Preview.exe.
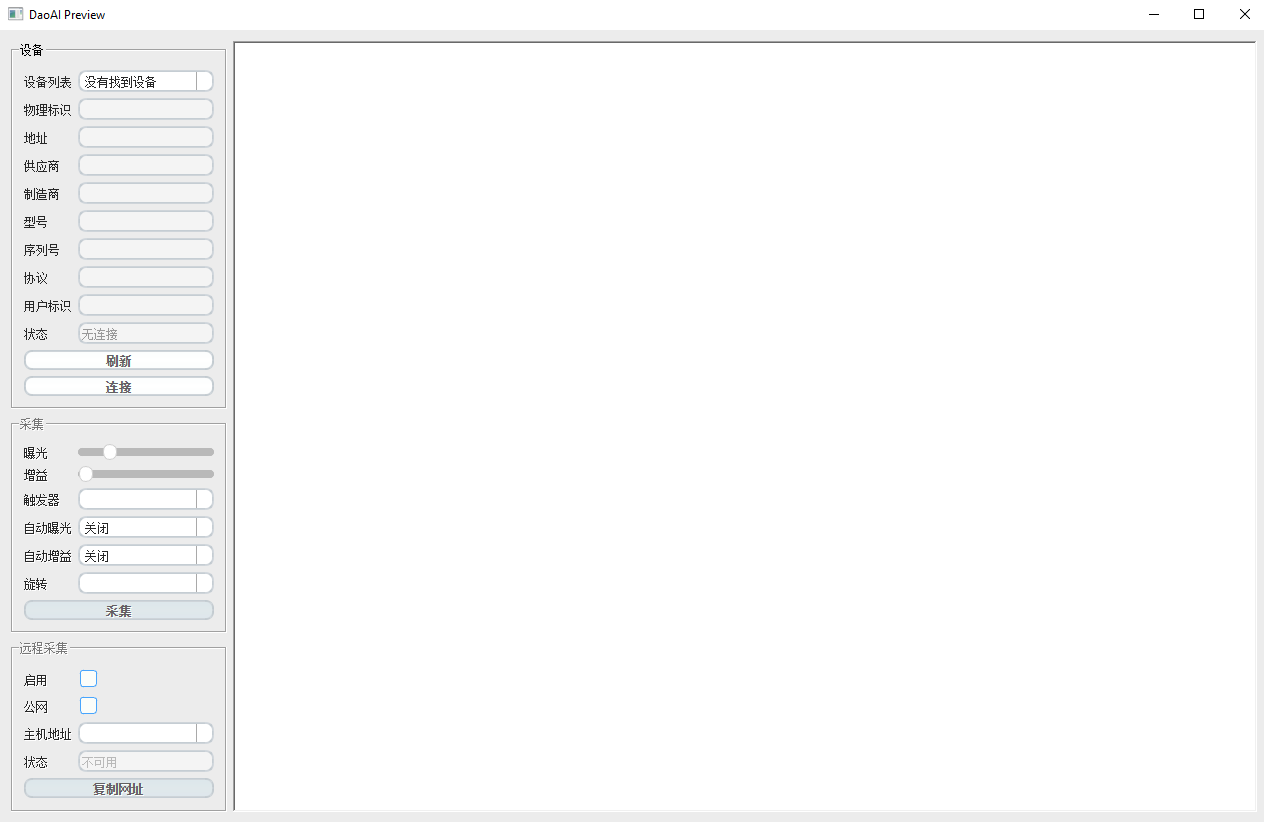
Then, you can see the software interface. At this point, you won’t find the camera yet. You need to use the zadig.exe software included in the folder to change the camera driver.
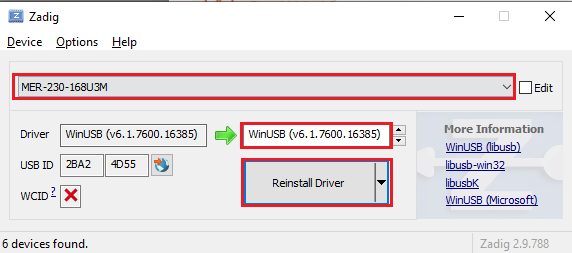
Replace camera driver using Zadig
Execute zadig.exe, click options, check the box for List All Devices.
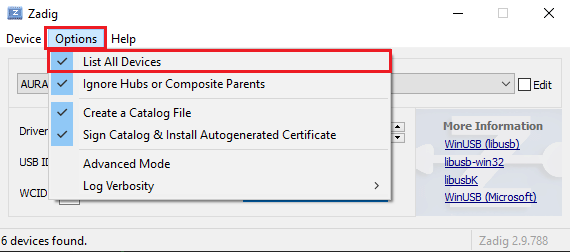
Select your camera device from the list, install the WinUSB (v6.1.7600) driver.
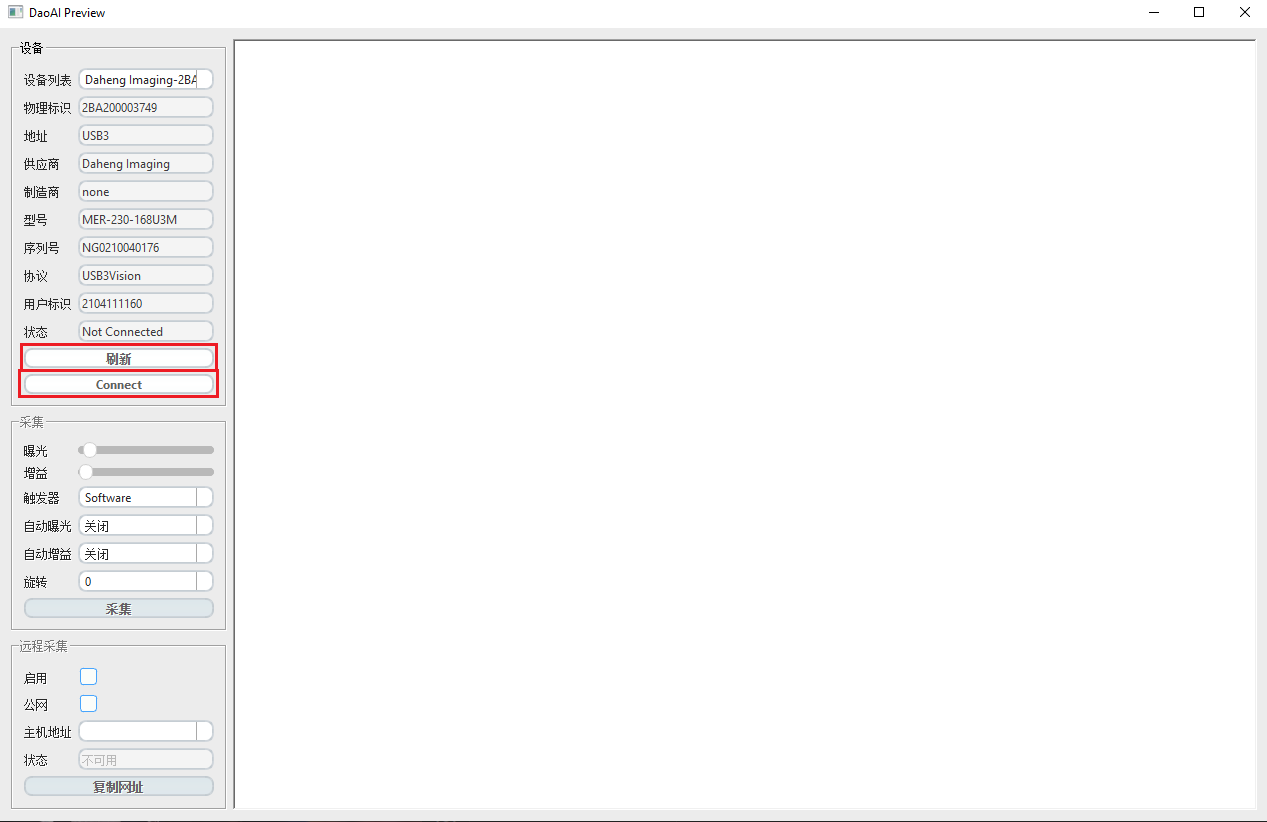
After successfully changing the driver, DaoAI Preview will detect the camera. Click Refresh to update the device list, select your camera, and then click Connect.
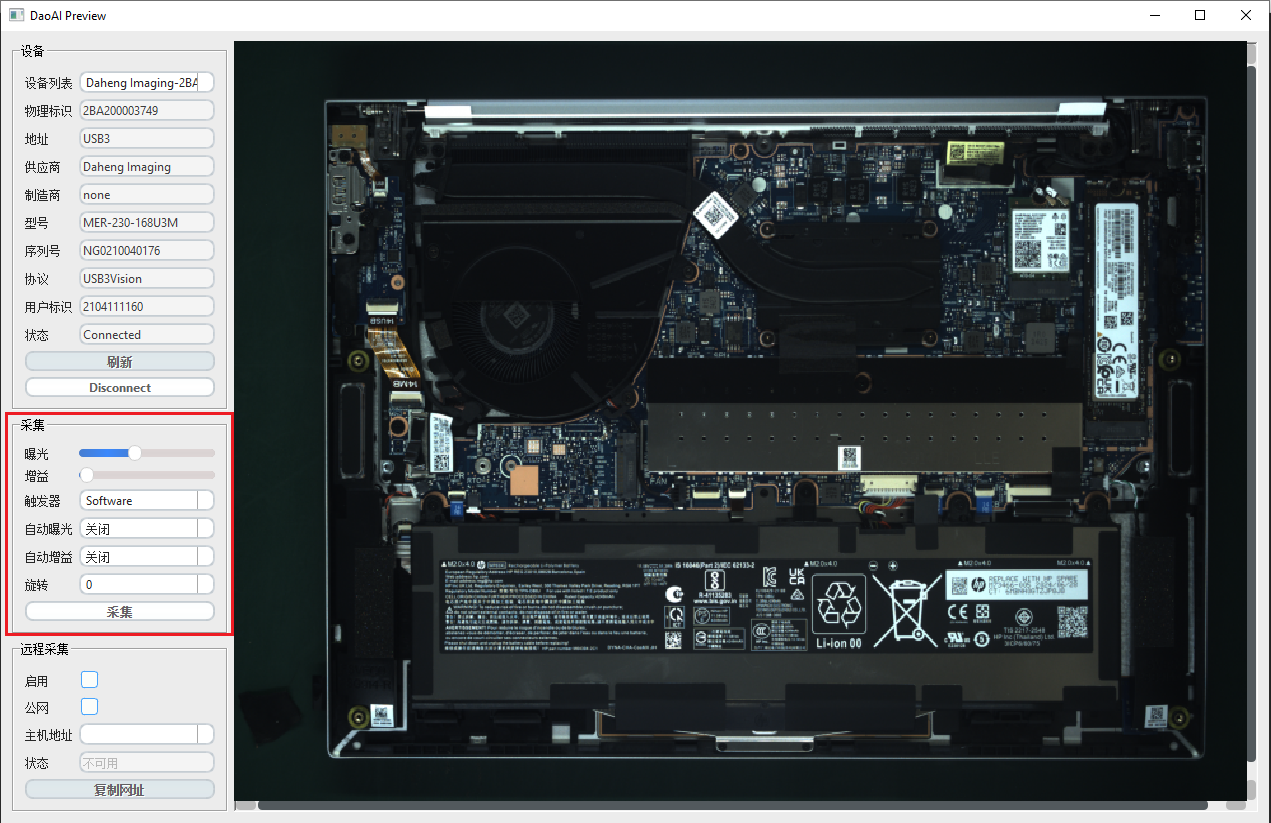
Adjust the camera's focus, exposure, gain, etc., and click Capture to view the image.
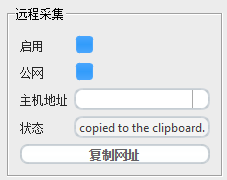
Enable remote capture, click Copy URL, return to DaoAI World, click Connect Now, and paste the URL into the host information field.
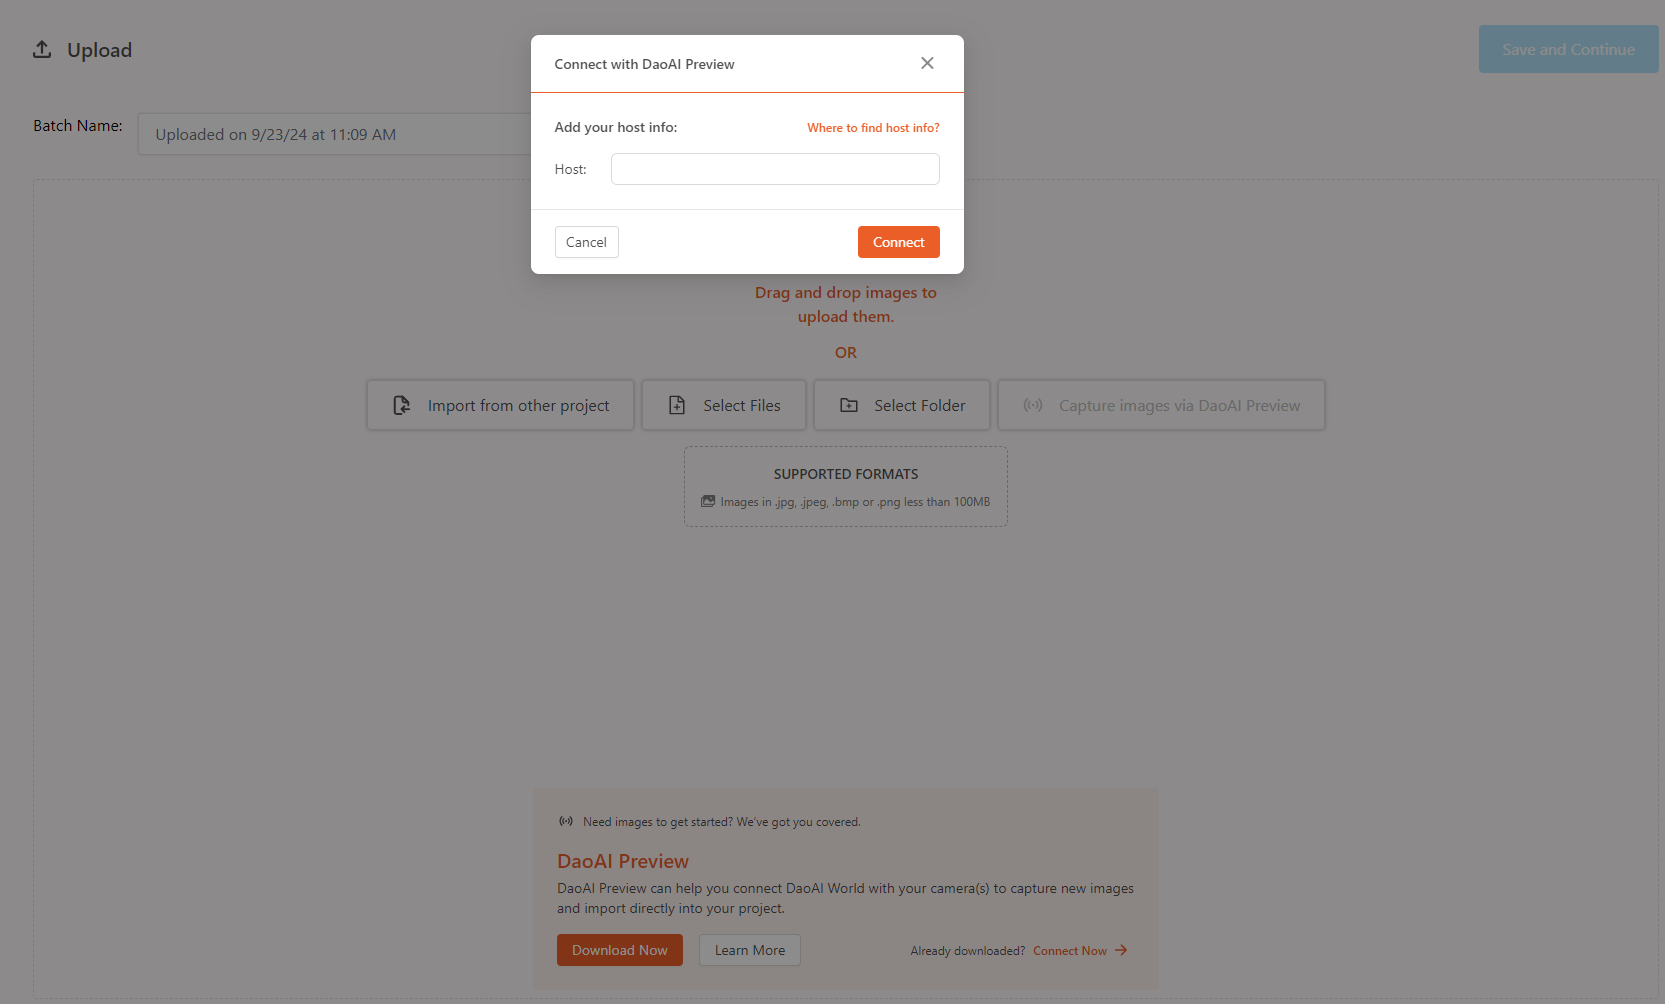
After a successful connection, click
Capture Image via DaoAI Previewto collect images to the upload list.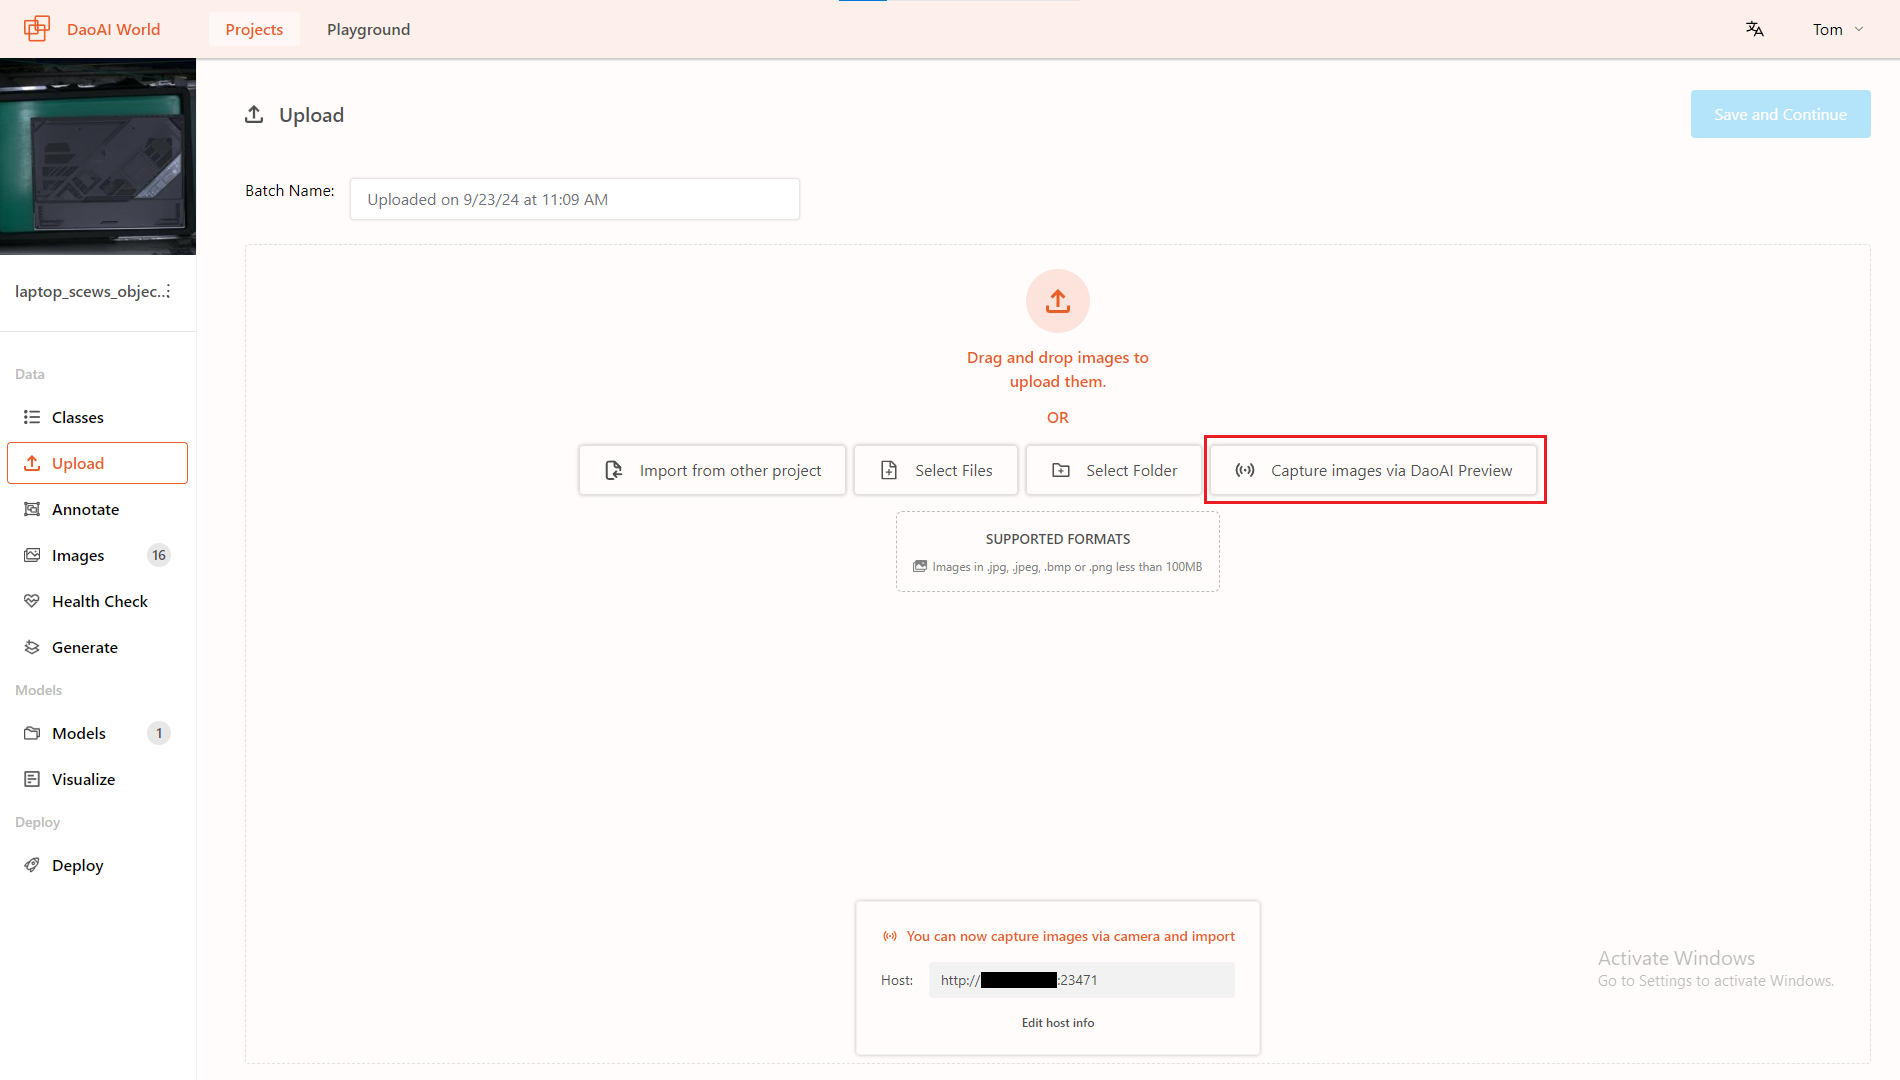
Continue to click
Capture Image via DaoAI Previewto keep collecting images. Once the collection is complete, clickSave and Continueto upload the images to the project.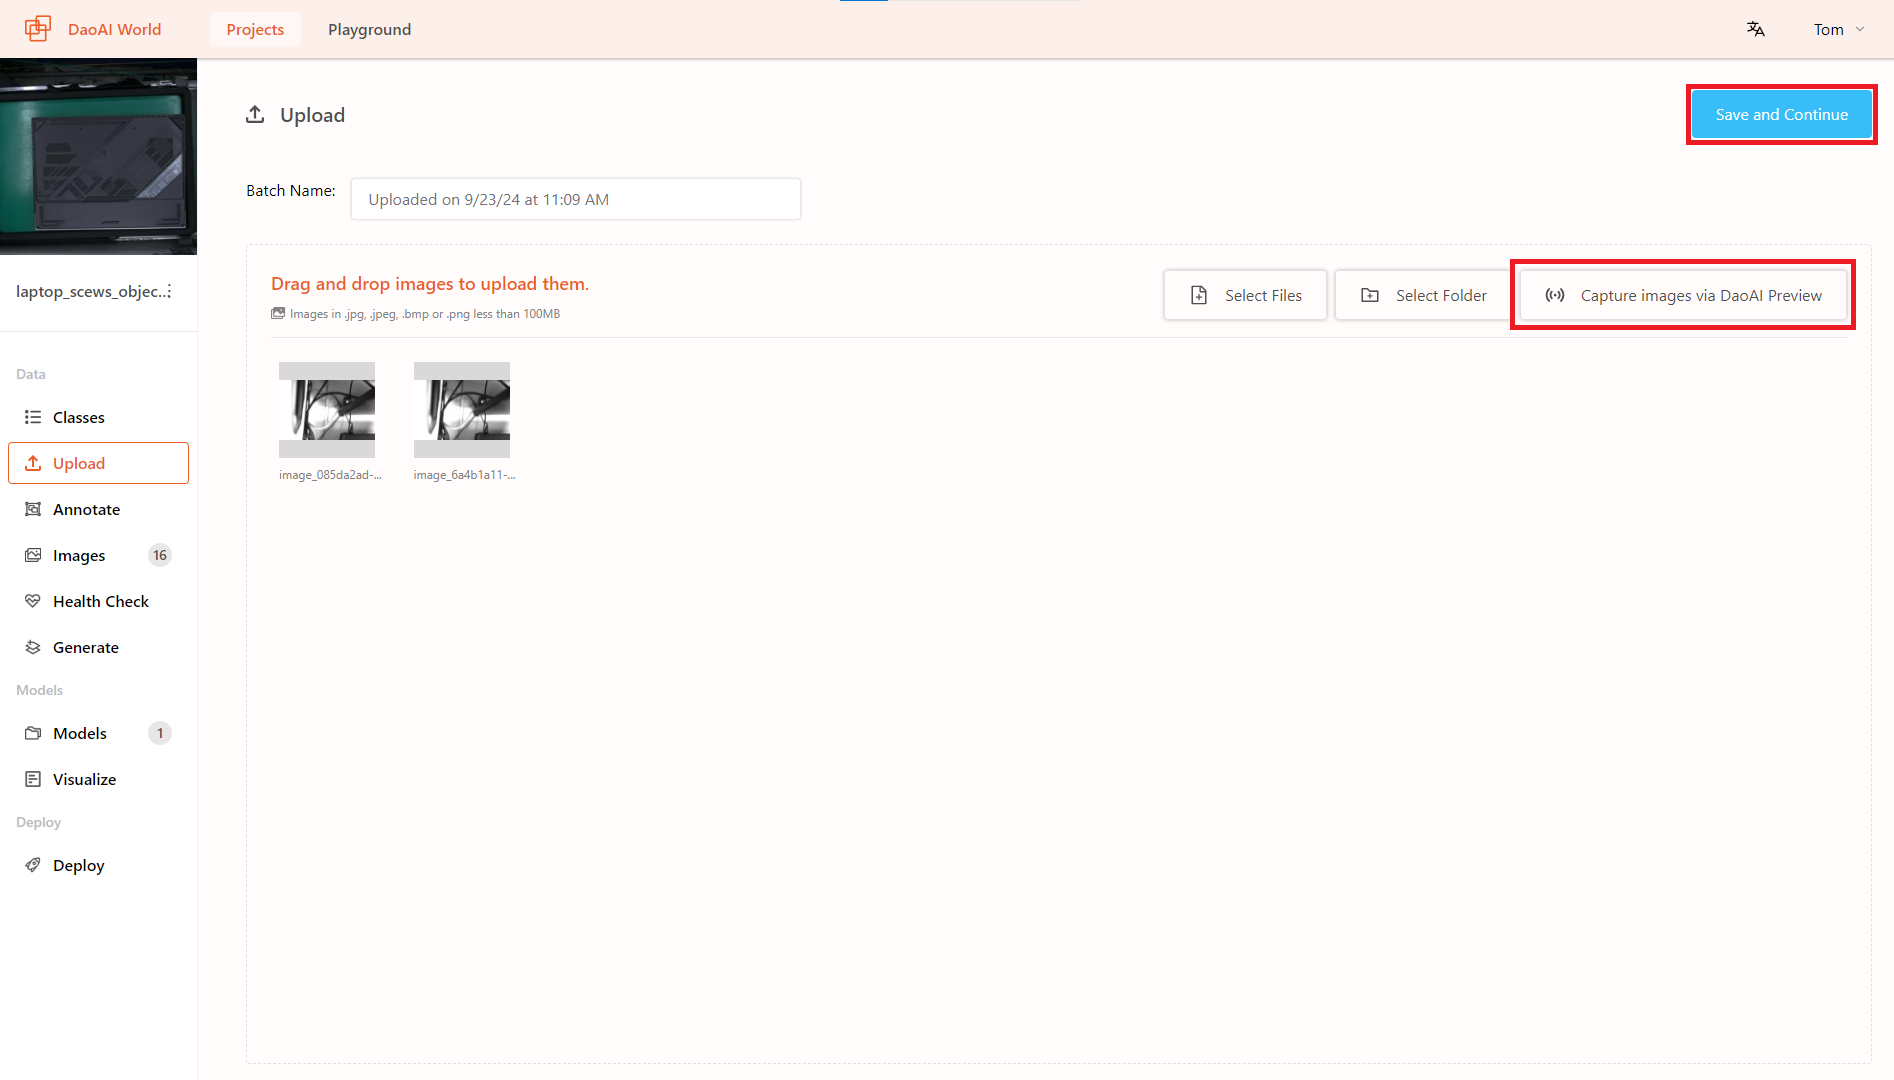
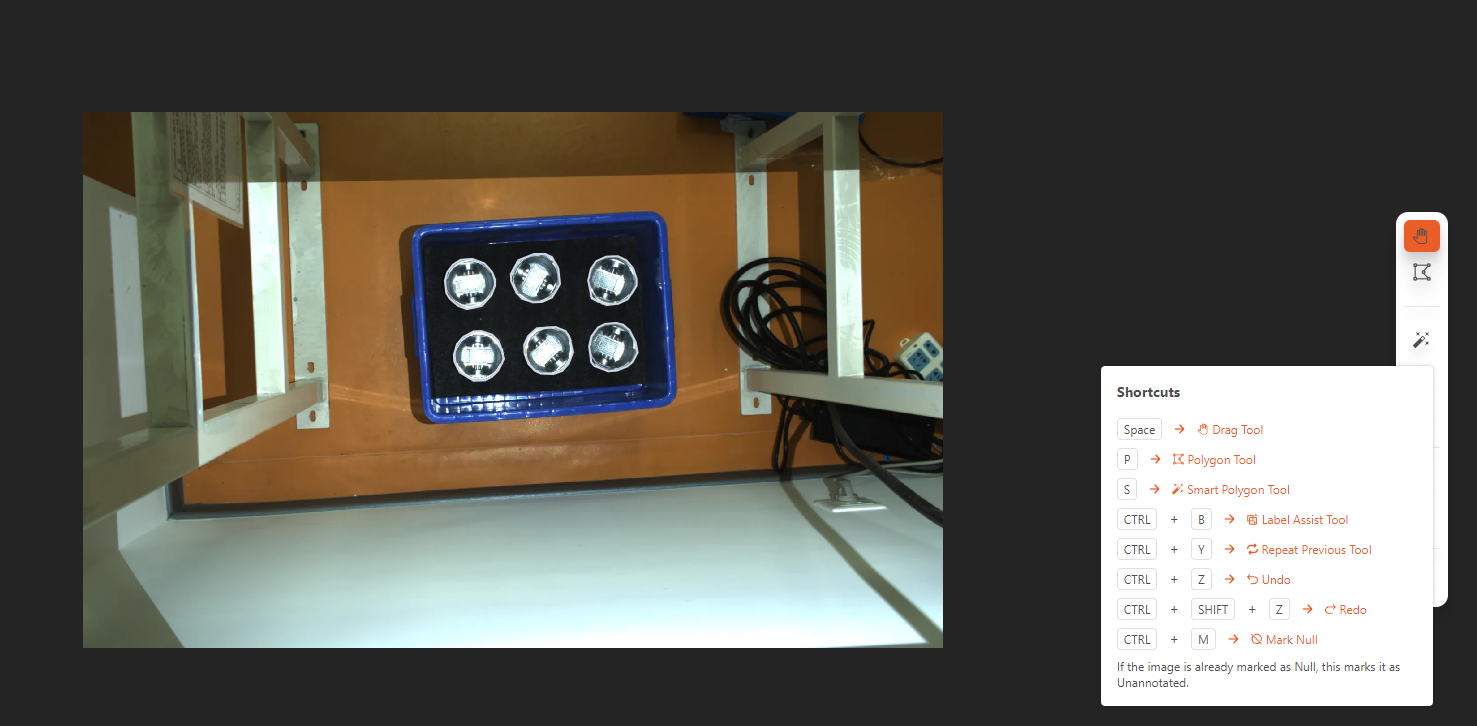
Annotation Tool
In DaoAI World, you can use annotation tools to label images. Depending on the type of training project, you can use different tools to annotate the images.
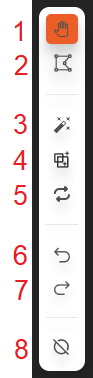
- Drag Tool
Shortcut:
SpacebarPan the image or select/reposition annotations.
How to use: Click and drag the image.
- Polygon Tool
Shortcut:
PFreehand draw annotations to achieve more precise shapes.
How to use: Click to add points. The polygon will enclose the selected area in the order the points are added. Click the first point to close the polygon or click "Finish" to automatically connect the last point with the first point, closing the polygon.
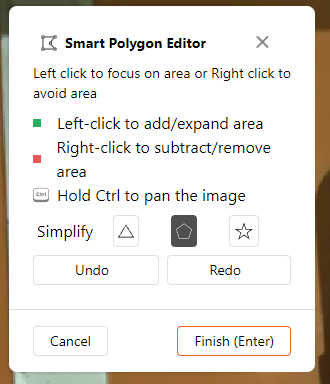
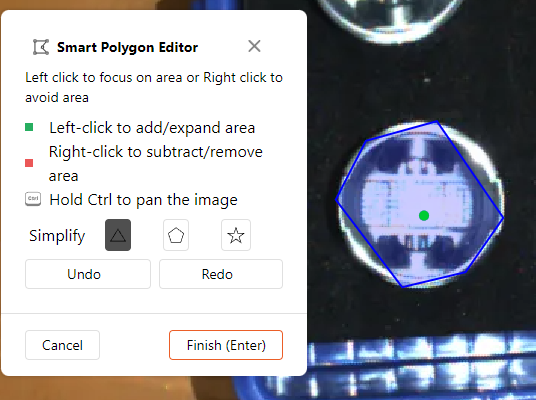
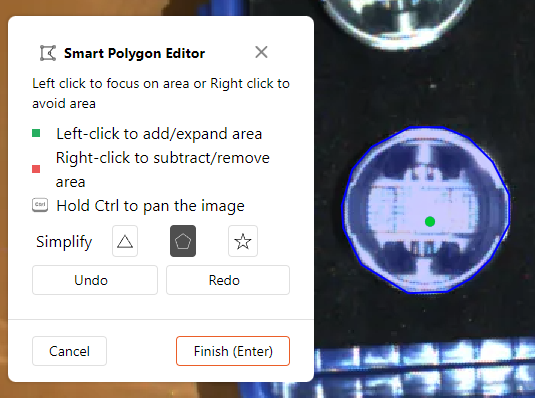
- Smart Polygon Tool
Shortcut:
SSmart Polygon Tool assists drawing polygon. Click on the center of the object, then continue clicking to add or subtract areas.
How to use: Move the mouse to the center of the object to generate a light blue area outlining the current polygon region. Move the mouse to adjust the selected area. Click the left mouse button to confirm the polygon area. Continue clicking the left mouse button to add more areas to the polygon region, or right-click to exclude some areas from the polygon. After finishing the polygon area selection, click "Save" to complete the polygon annotation.
- Label Assist Tool
Shortcut:
Ctrl+BUse the trained model to annotate the current dataset (depending on the model's accuracy, the assisted annotation may contain errors. After annotation, it is necessary to manually check if the annotations are correct).
- Repeat Previous Tool
Shortcut:
Ctrl+YApply all annotations from the previous image (useful for video frames).
- Undo
Shortcut:
Ctrl+ZUndo the last action.
- Redo
Shortcut: ``Ctrl+Shift+Z ``
Redo the last action.
- Mark Null
Shortcut:
Ctrl+MThere are no annotatable objects in the current image. An empty image is one without any objects of interest. Unannotated images are awaiting manual annotation.
You can also find the keyboard icon in the lower right corner of the annotation interface to expand the list of keyboard shortcuts.
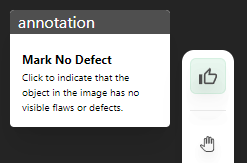
In Unsupervised Defect Segmentation, in addition to the aforementioned annotation tools, a Mark No Defect feature is also provided:
- Mark No Defect
Annotate the current image as a lossless image, indicating that there are no anomalous objects in the current image.
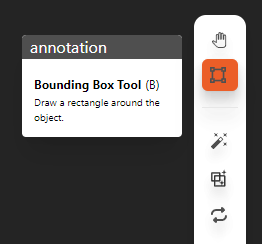
In Object Detection, we have replaced the Polygon Tool with the Bounding Box Tool:
- Bounding Box Tool
Shortcut:
BUsed to annotate the object's bounding box.
How to use: Click the left mouse button to select one corner of the bounding box, move the mouse to outline the object, and click the left mouse button again to complete the object selection.
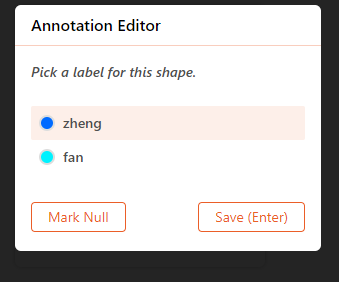
In Classification Detection, since the project classifies the entire image, no annotation tools are provided. You can directly assign a label to the whole image.
In Smart Annotation, you can choose from three annotation styles: Simple, Smooth, and Copy. Additionally, the annotation window can be dragged with the mouse during the annotation process. If the window obstructs the view while annotating, you can move the window to avoid blocking.
Simple: Uses as few points as possible to draw a simple mask along the edges.
- Smooth: Uses an appropriate number of points to trace the edges, making the mask fit the object's surface with smooth edges.
- Complex: Uses as many points as possible to trace the edges, maximizing the mask's fit to the object's surface and preserving any fine details along the edges.

The specific annotation methods for each model can be referenced in Select a Model。
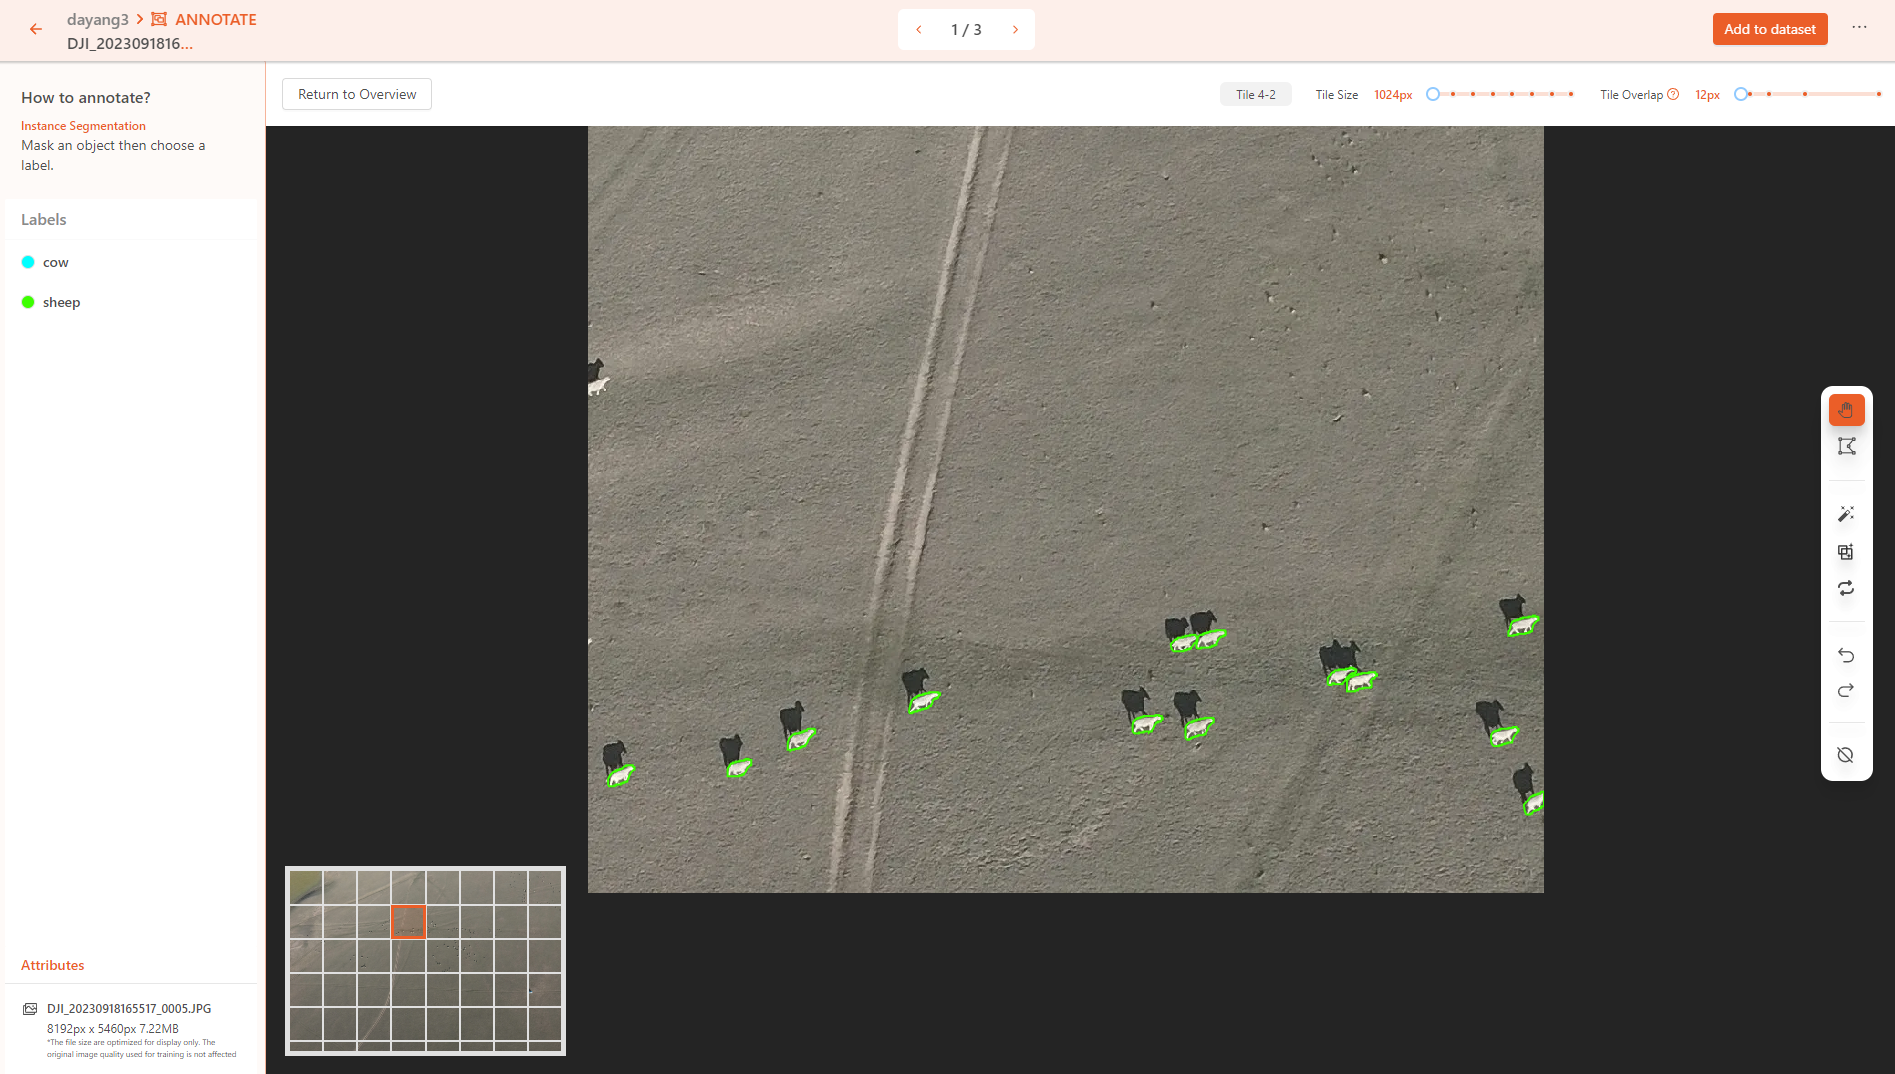
Large Image Tile Annotation Mode
For high-resolution images, the smart annotation tool may sometimes fail to accurately fit the object's edges. This is because deep learning models typically require a fixed image resolution during inference, and the higher the image resolution, the more compression is applied during processing, which affects the annotation accuracy.
By splitting high-resolution images into smaller regions for annotation, the resolution of each region is reduced. This allows the smart annotation tool to more accurately annotate target objects, improving the overall annotation quality.
Segmentation annotation involves first dividing the image into smaller sections, then annotating the target objects within each smaller image. After annotation is complete, the algorithm integrates the annotation data back into the original image, enabling more precise object annotation in high-resolution images.
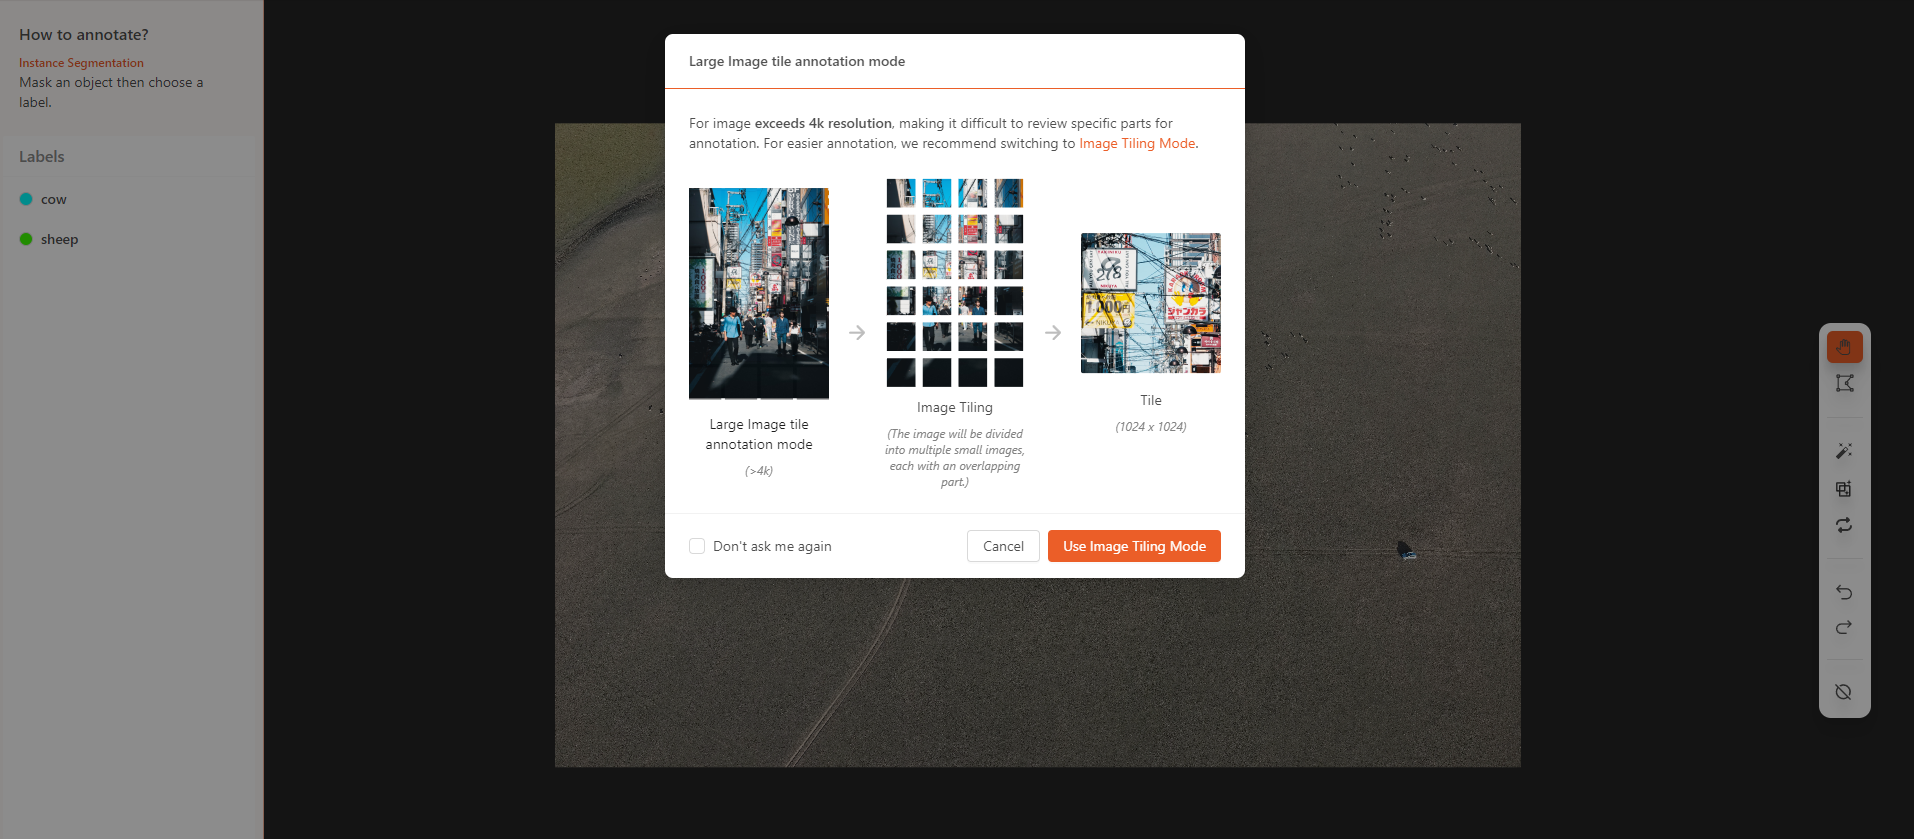
During annotation, you can select the size of the image slices and the overlap in the top-right corner. If an object is partially cut by the slicing process, the overlap feature allows one of the adjacent slices to fully capture the object, while the other slice that doesn't contain the full object can be left unannotated.
In the lower-left corner, you can view a thumbnail of the large image after segmentation, with the currently annotated area highlighted. After completing the annotation for one area, simply click on the next area to continue annotating. Once all annotations are finished, you can proceed to the next image for annotation.
Annotation Data Management Batches
When you upload a batch of data to DaoAI World, the uploaded data will be organized into a batch. This batch consists of a group of images that you can view in the annotation interface of DaoAI World. In the Annotations list, you can annotate and manage each batch individually and add completed batches to the dataset.
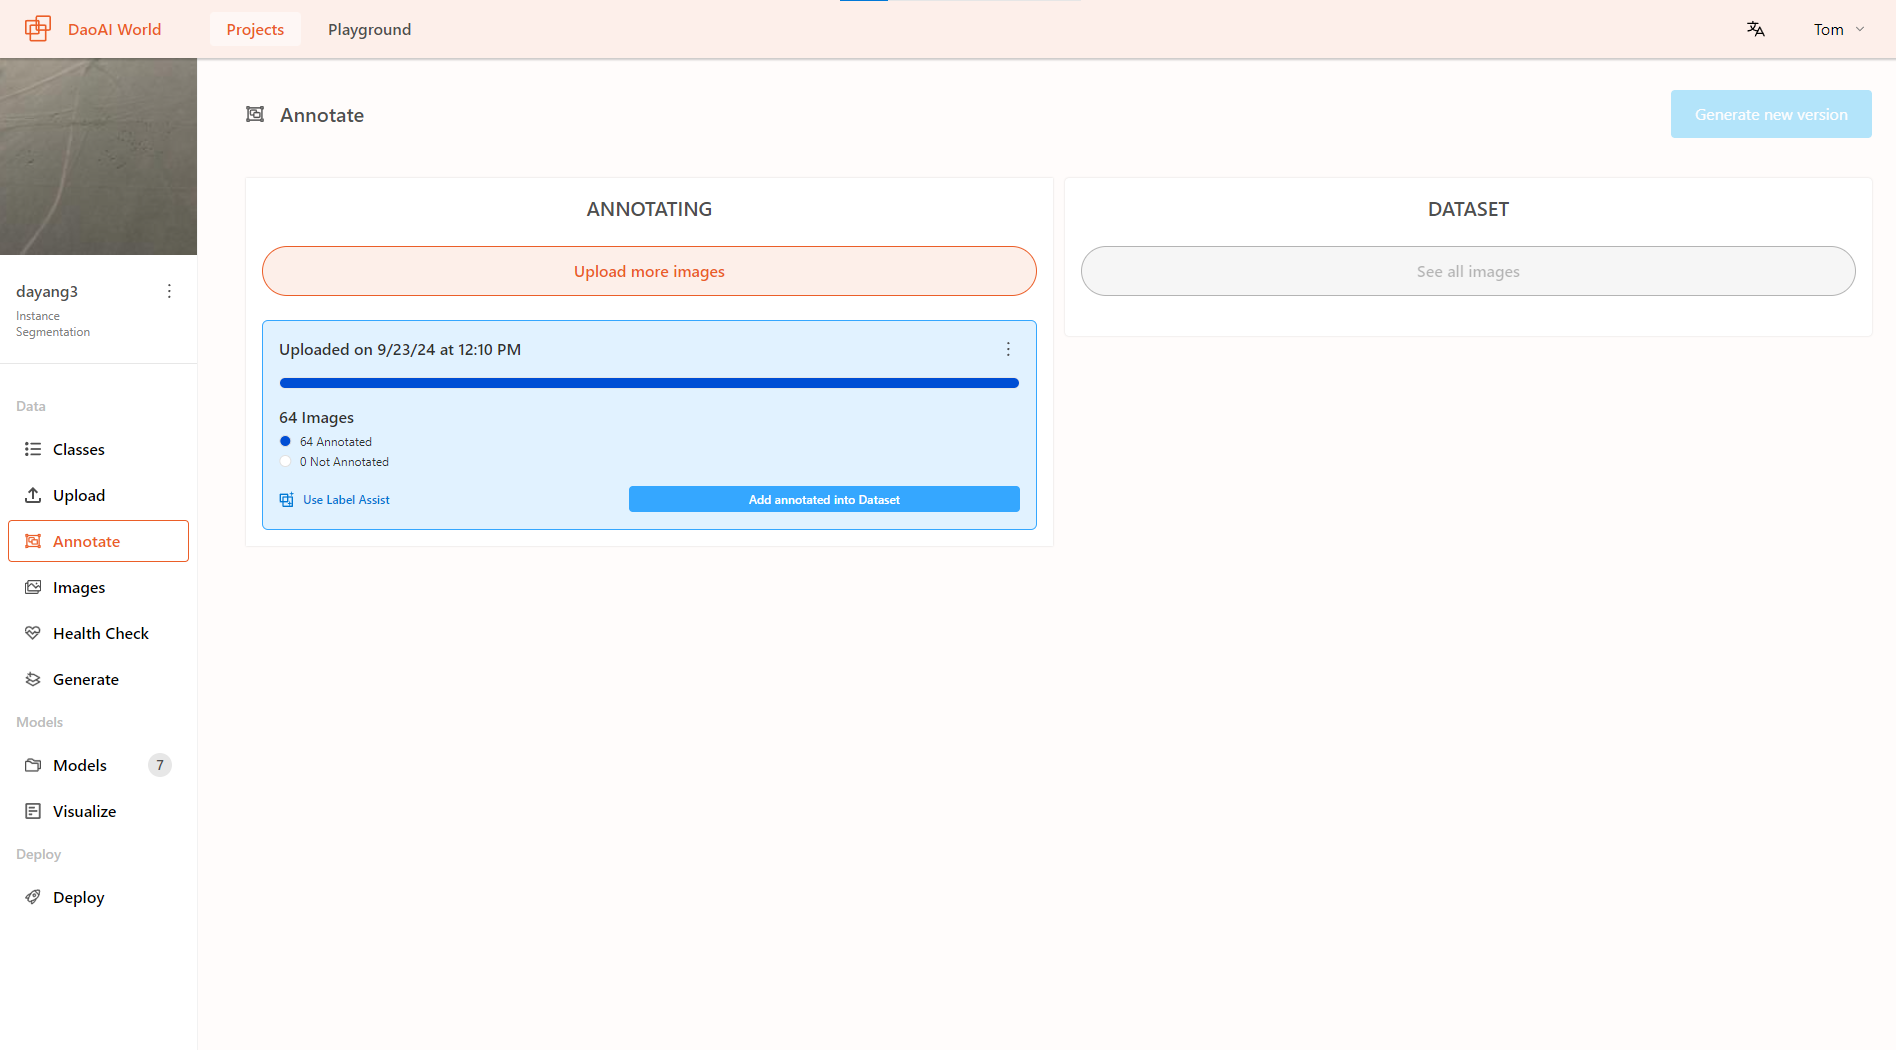
Batch Management
After uploading unannotated images, they will be assigned to the "Annotating" list.
You can annotate a batch of data multiple times. Once the annotation is complete, you can click Add Annotated into Dataset to add the annotated data to the dataset. Any remaining unannotated data in the batch will be assigned to a new batch.
Delete Batch
警告
Please note that deletion is permanent and irreversible. You should ensure that this action will not impact your upcoming projects before proceeding with the deletion.
You can delete a batch by clicking the three dots in the upper right corner of the batch and selecting "Delete Dataset."

警告
Again, please note that deletion is permanent and irreversible. You must ensure that this action will not impact your upcoming projects before proceeding with the deletion.
Dataset Management
Search Data
You can search for images by name using the search bar at the top.
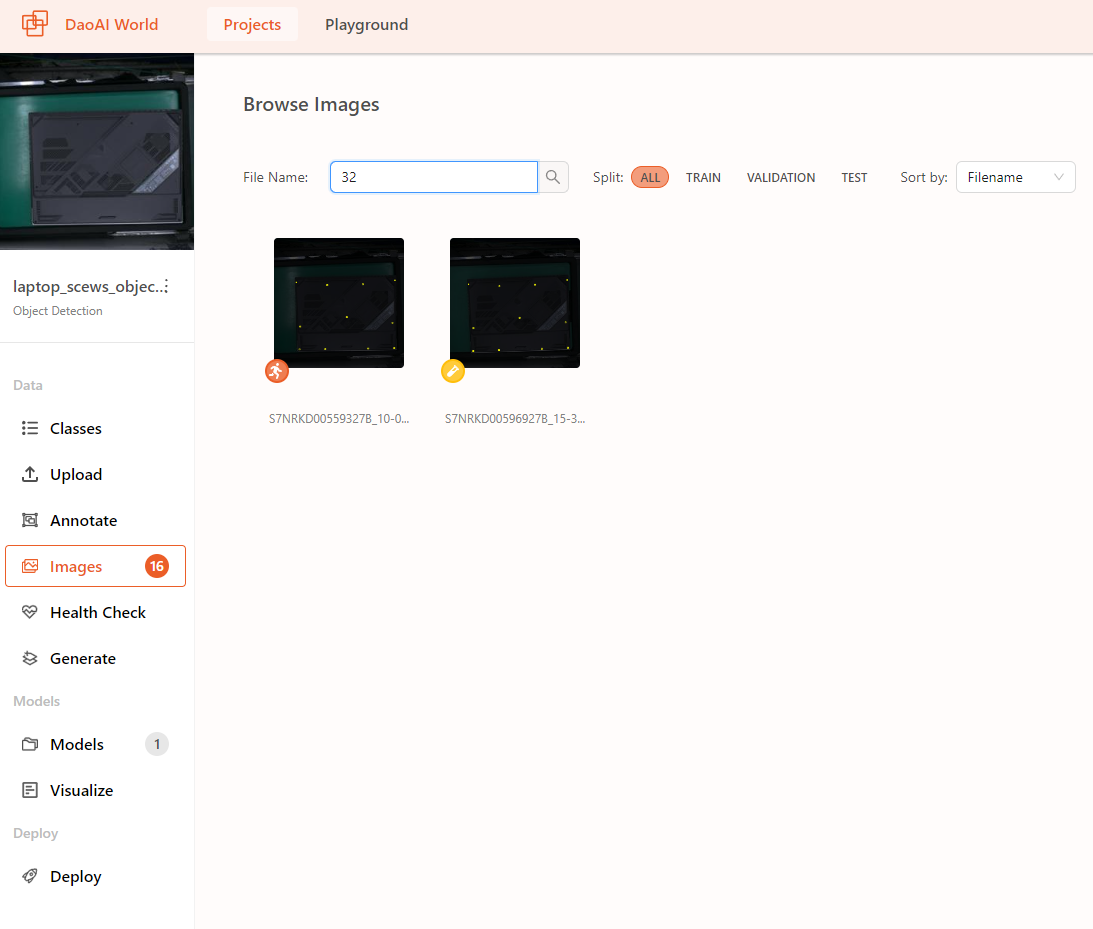
You can also filter the search results by training, validation, or test sets.

Change Image to Training, Validation, or Test Set
The lower-left corner of the image will display an icon indicating whether the image is in the training, validation, or test set.
You can select any image and choose to add it to the training set, validation set, or test set.
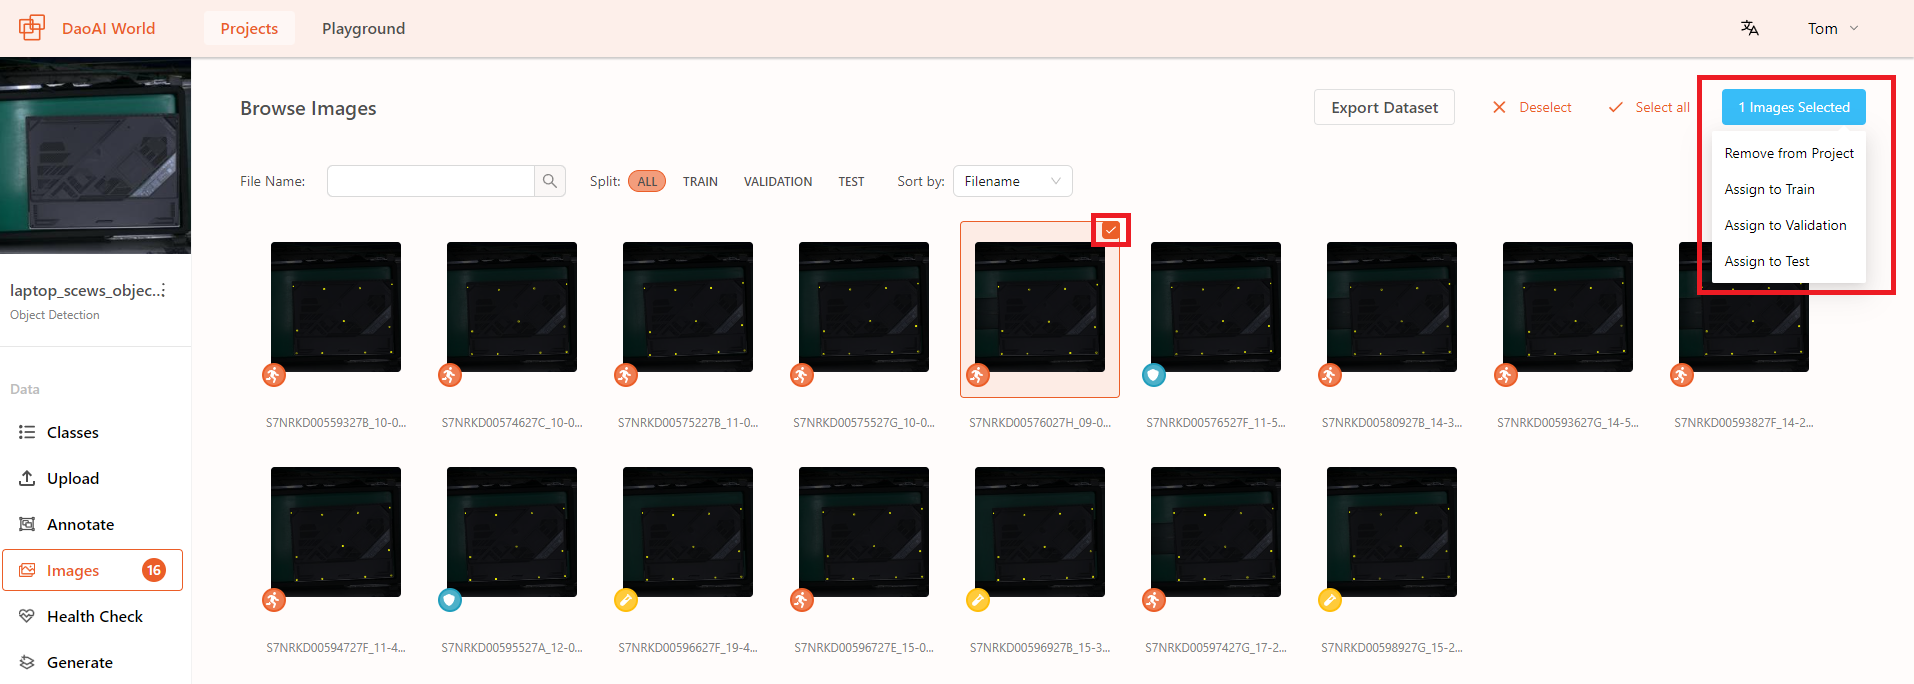
Remove Data
In DaoAI World, you can remove uploaded images. Removing images is an irreversible action, and the removed images cannot be restored. Please proceed with caution.
You can remove single or multiple images from the dataset.
On the dataset page, hover over the image you want to remove and click the upper-right corner of the image to select it:
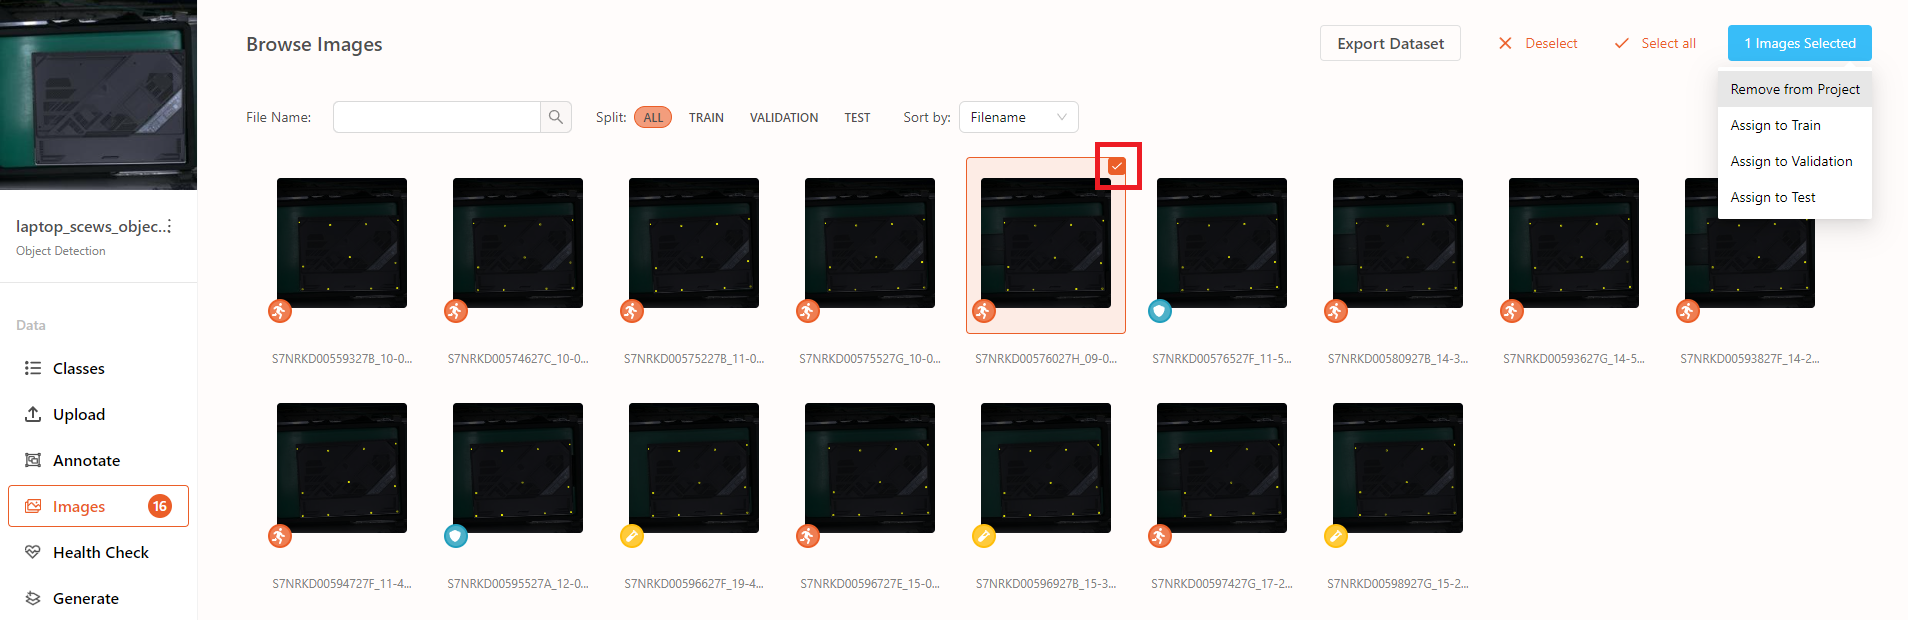
Then click the button in the upper-right corner and select "Remove from Project" from the dropdown menu to remove the selected images:
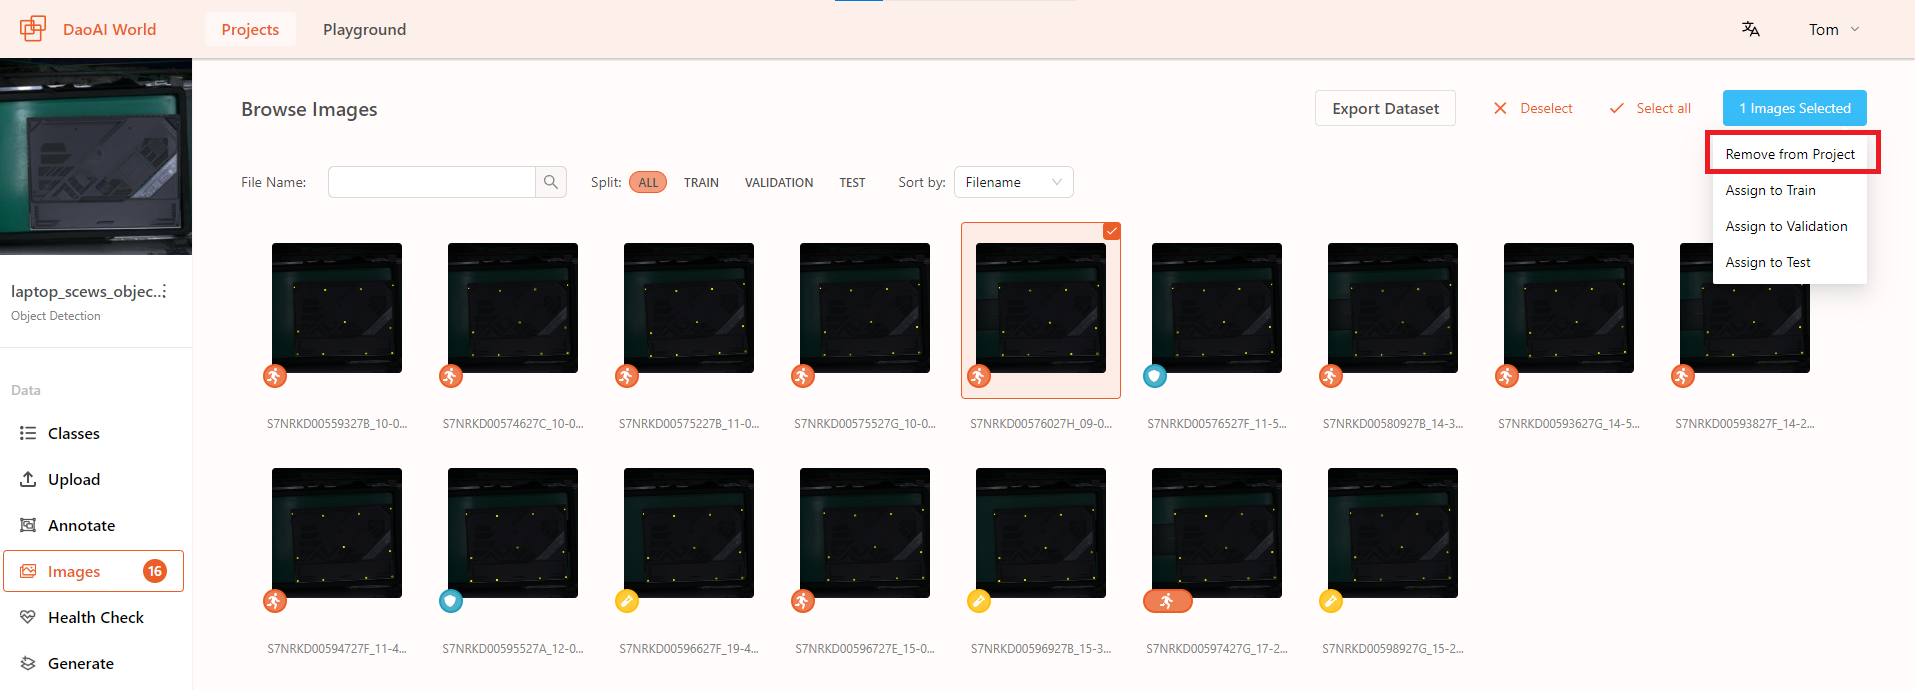
If you want to delete multiple images, you can select several images at once and delete them simultaneously.
Export Dataset
Export Data from DaoAI World.
You can export data from DaoAI World at any time. You can use the DaoAI World web interface to perform the export.
To export a dataset, first click Images in the sidebar of the DaoAI World project interface. In the dataset page, click the Export Dataset button to export the data.
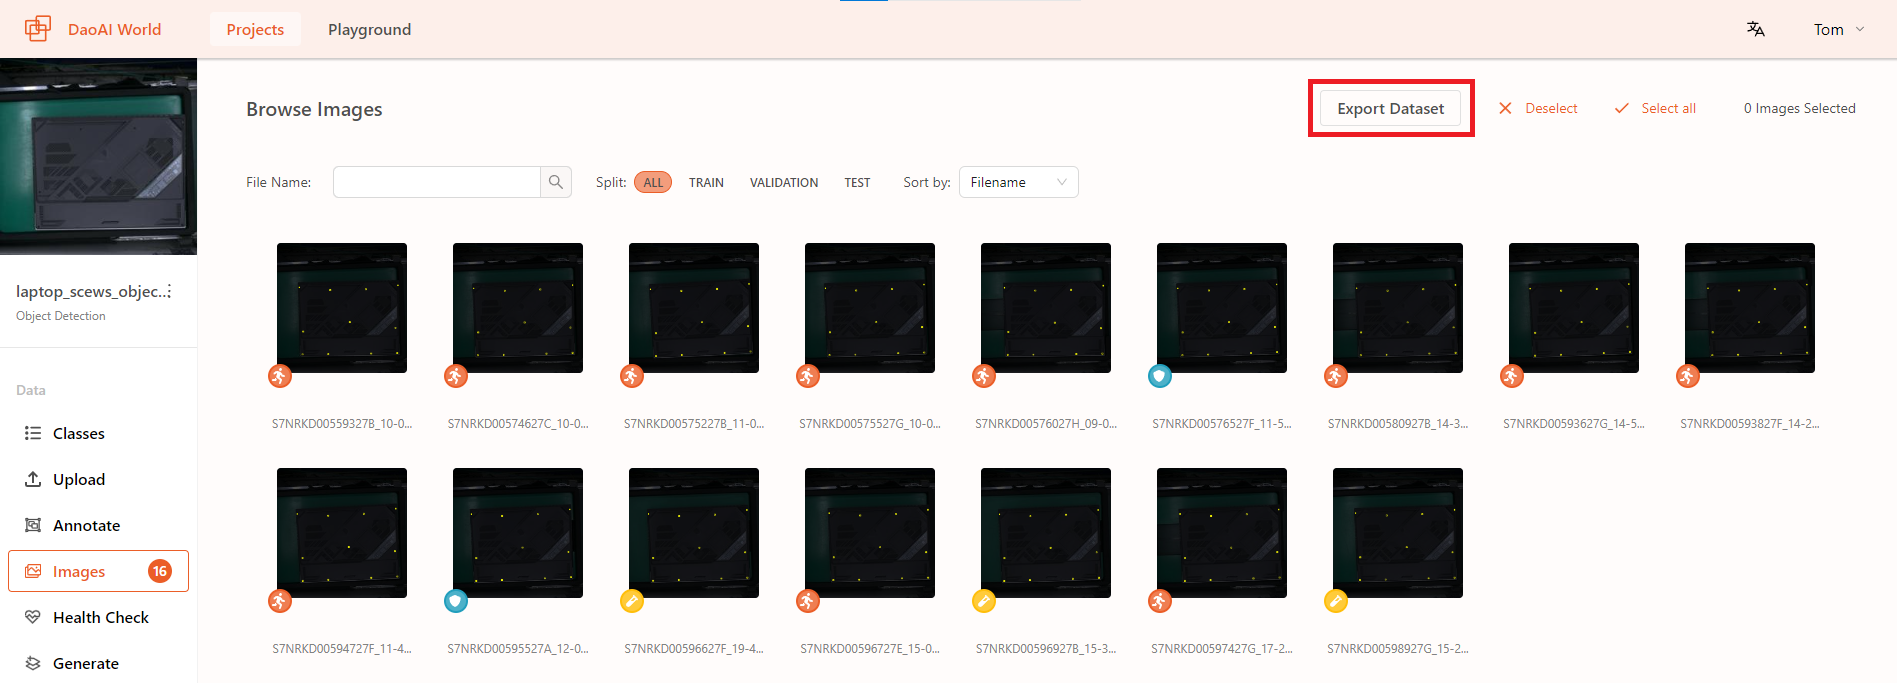
In the Export Dataset interface, you can choose to download the data as a .zip file or use curl to download it from the command line.
